Reputation Protection helps marketers maintain their reputation, by skipping email sends to likely unsubscribers. The benefits are improved delivery, reach, and engagement.
You can also watch this video which explains this feature.
What is Reputation Protection?
Marigold AI will predict which recipients have an elevated likelihood of unsubscribing and of possibly reporting spam so AI can remove them from a Campaign. To use this feature:
-
At the sender profile level you will be able to activate Reputation Protection.
-
At the Campaign level you can select the protected Sender Profile, and disable Reputation Protection if needed.
Campaign Analytics will show how many recipients were held back.
What is a Control Group?
A control group is a subset of users excluded from model-driven decisions to serve as a baseline for comparison. It helps measure the true impact of the model by showing how users behave without model interventions.
Marigold AI models maintain a control group consisting of a random selection of your recipients. This control group serves as a baseline, allowing you to measure the model's impact by comparing results against users who were not influenced by the model. The control group is static, meaning once a recipient is selected into the control group, they remain in it. This consistency ensures accurate comparisons over time.
Who are Unscored Users?
Some users may remain unscored by the model because there isn't enough behavioral data collected about them. Without sufficient data (e.g., opens, clicks, purchases), the model cannot predict outcomes for these users.
An example of an unscored user is a new subscriber, as the model does not yet have sufficient data about their behavior. Another example is an inactive user who hasn't engaged with the platform recently, resulting in limited behavioral signals for the model to analyze.
How to request Reputation Protection
Reputation Protection is an optional feature that must be enabled in your account. Please speak with your Marigold Representative for more details. You must also have Personalized Send Time feature enabled in your account to use Reputation Protection.
How to use Reputation Protection
After your Marigold representative configures the Reputation Protection feature for your account, follow the steps below to use the feature.
-
At the sender profile level you will be able to activate Reputation Protection.
-
At the Campaign level you can select the protected Sender Profile, and disable Reputation Protection if needed.
Setting up Reputation Protection in Sender Profile
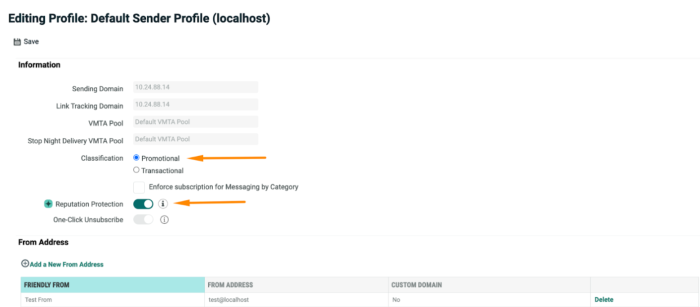
Reputation Protection can be configured and set up in the Promotional Sender Profiles. Sender Profiles with Transactional classification does not support this feature.
To Setup Reputation Protection:
-
In Cheetah Digital Admin Banner Bar, select Settings > Campaign Settings > Sender Profiles, and click on the sender profile to enable Reputation Protection.
-
If the Sender Profile is of “Promotional” Classification, then you’ll see the new option to configure Reputation Protection.
-
Slide the toggle to enable Reputation Protection.

Enabling/ Disabling Reputation Protection in Email Campaign
Reputation Protection is supported in both One-Time and Date Triggered email campaigns. However, is not available for Event-triggered email campaigns.
To Enable/ Disable Reputation Protection in Email Campaigns:
Ensure you have setup the Sender Profile with Reputation Protection (as given above).
-
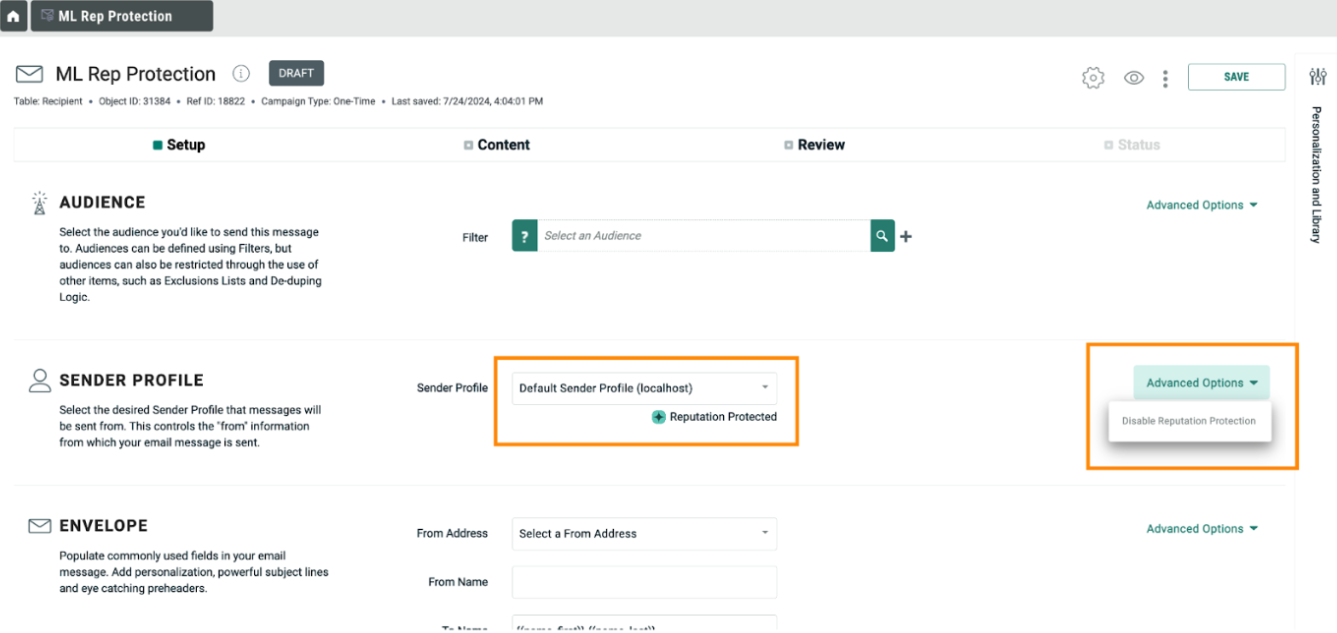
Open the email campaign to enable Reputation Protection.
-
In the Setup tab, scroll to Sender Profile section.
-
From the Sender Profile drop down, select the Sender Profile with Reputation Protection setup. Marigold AI will predict which recipients have an elevated likelihood of unsubscribing and of possibly reporting spam so ML can remove them from the campaign.
-
Alternatively, you can disable the Reputation Protection for the campaign if needed by clicking Disable Reputation Protection from the Advanced Options dropdown.
For cells and splits campaigns, if a campaign is split by “From Name and Sender Profile”, you can define the Reputation Protection setting at the cell level.

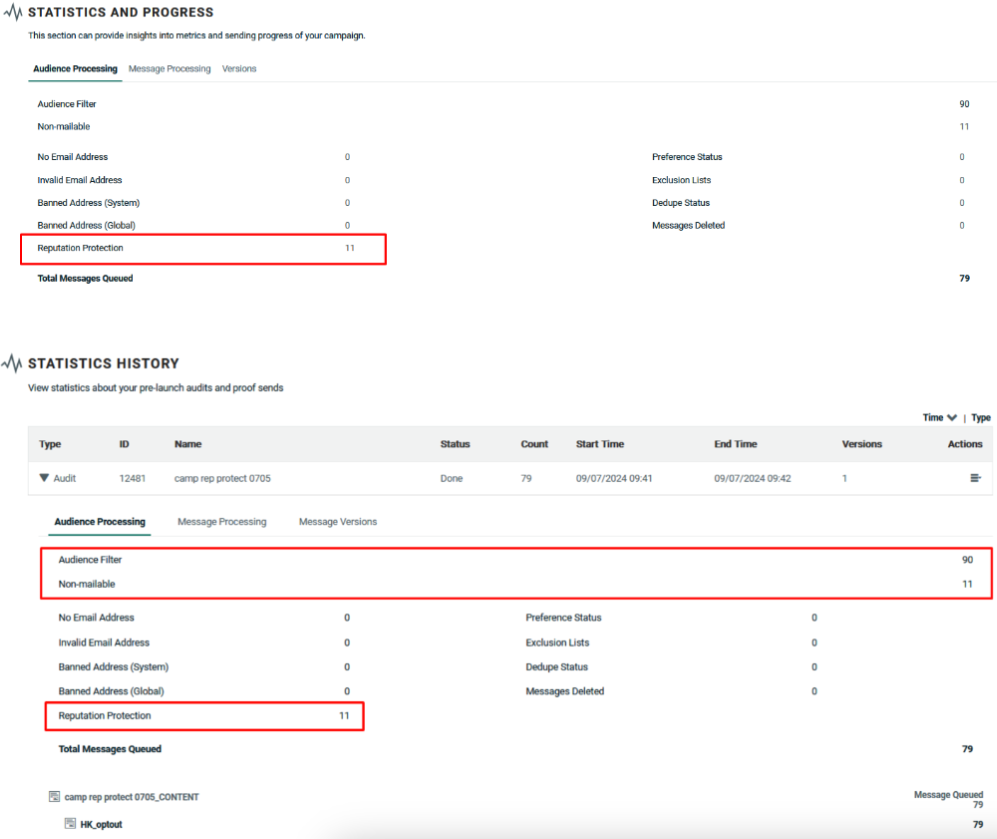
Viewing Reputation Protection exclusion statistics
When a campaign is launched with Reputation Protection, you will see the Reputation Protection exclusion stats in the Audience Processing tab.
Understanding Exclusion Calculation
The exclusion calculation is based on two settings defined by your Marigold representative in the admin module.
-
"Exclude Sending to Likelihood To Unsubscribe" determines who will be excluded from the mailing. High is selected as default.
-
When High is selected, subscribers whose Likelihood to Unsubcribe score is high will be excluded from the mailing.
-
If Medium and High are both selected, subscribers whose Likelihood to Unsubcribe score is High and Medium will be excluded from the mailing.
-
-
The "Reputation Protection Volume" controls how many emails Reputation Protection will exclude. This is the percentage chance (1-100) that each recipient with a High Propensity to Unsubscribe will be excluded from the mailing.
-
If the percent is set to 100 then ALL recipients with a Propensity to Unsubscribe Group = “high” will be excluded.
-
If the percentage is 50, then each of the “high” people has a 50% chance of being excluded.
-
The default setting is 50%. Please discuss with your Marigold representative if you wish to adjust this value.
-
Note: For date-triggered campaigns, the exclusion count will vary as the system recalculates the audience each time and applies the exclusion randomly based on the Reputation Protection Volume.
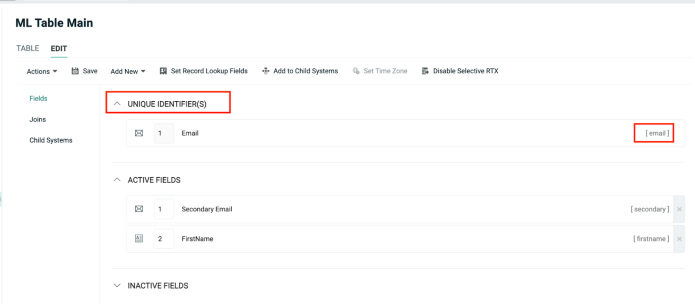
Using ML fields in Cheetah Digital for segmentation
When Reputation Protection feature is enabled for your organization, you can also use the model’s related field - likelihood to unsubscribe in Filters for segmentation purposes through Cheetah Digital Table Join.

To do so, joins must be defined from your customer’s table to the Machine Learning Recipient table. Please follow the steps below to create the join.
Defining joins to the machine learning recipient table and using in filters
This Machine Learning Recipient Table can be joined to a customer’s tables using two different types of joins
-
Property join is a "one-off" join method used in creating filter logic, and is not a permanent join.
-
Entity join: can only be defined by a Marigold admin. This is a more permanent join method, as these joins cannot be deleted once defined. Please contact your Marigold Representative to assist you in setting up entity joins for your tables. Entity joins are usually work faster than property joins, when implemented.
Property Join
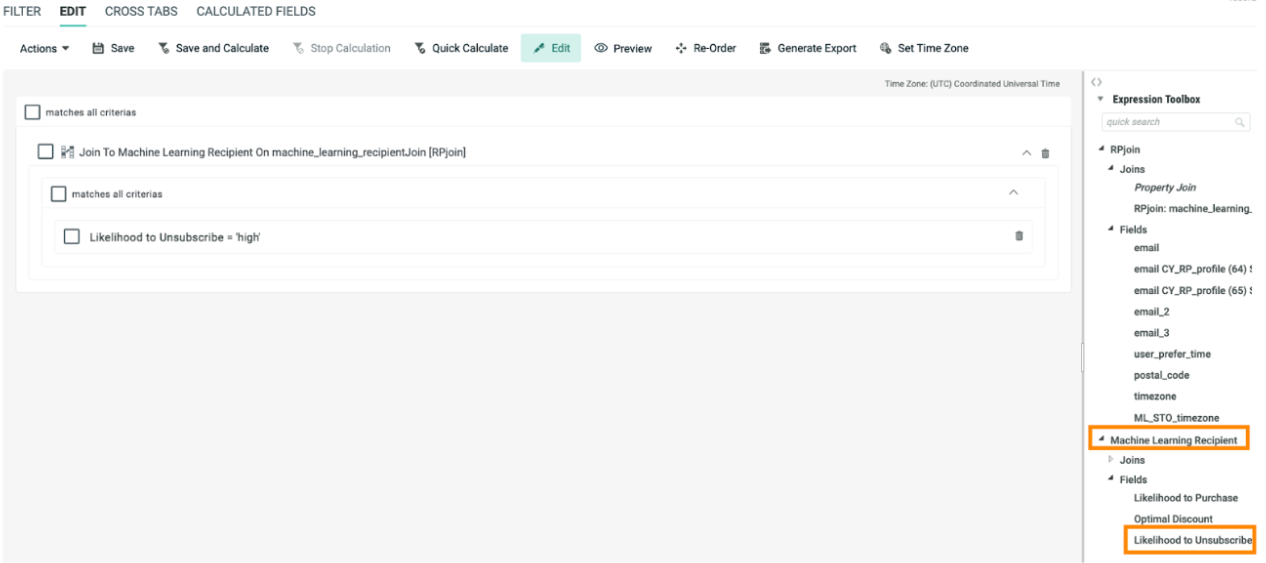
When the ML models for Personalized Send Time and Reputation Protection are enabled in your account, the Machine Learning Recipient table will be available in the filter for property-to-property join via a common field - email address.
To join the current table to the Machine Learning Recipient (AI Profile) Table, from the Expression Toolbox in the right pane, select the customer table (Recipient table in the above example) > Joins > Property join, then drag and drop the Property Join to the Filter.
In the displayed popup window enter select “email_address” as the field to join and Machine Learning Recipient as the Table to Join.
Click Add Join.
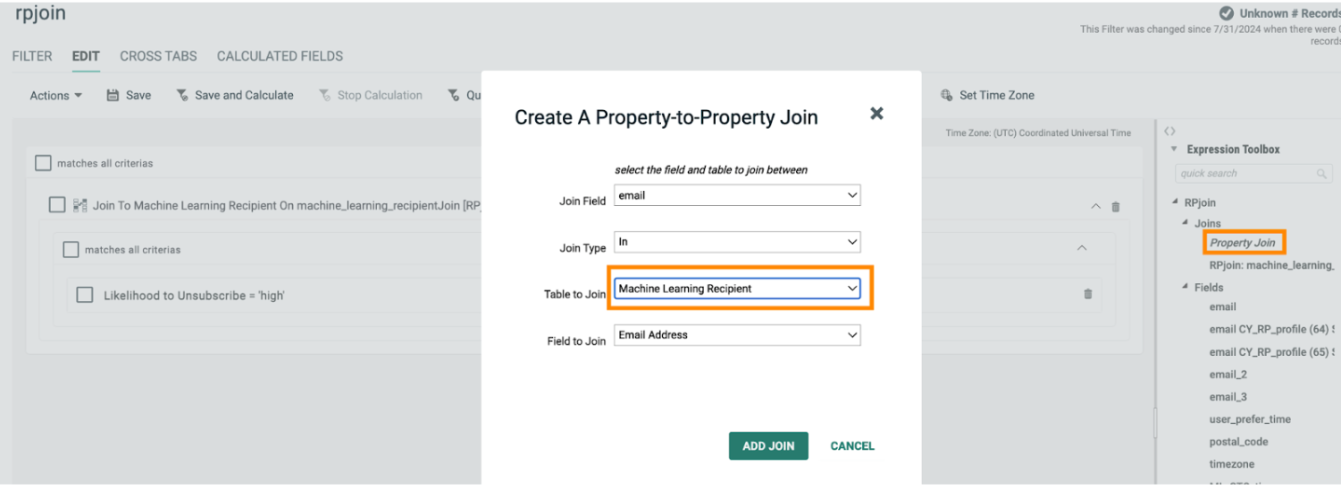
When a property join is defined in a filter, you can use the Machine Learning Recipient attributes for segmentation.
Entity Join